
As I travel all over with my husband... And at times live out of a suitcase. I need to keep my creative side going. I don't have a yard at the moment that I can enjoy and piddle around in. Or a home that I can decorate. Doing these lil projects keeps me in that decor mode.
I found on ebay, a woman who sells wonderful vintage reproduction prints on fabric. And I fell in love with this print.
 The optomist! Doesn't this pic just make you smile! I love the detail, and the utter concentration on the 'lil man's' face. I love the detail and the look on the puppies face. I love the amused, kind smile on the old man's face..and above all I love all the colors in this print.
I wondered how could i make this into a display piece! The print is only a 5x7. If your anything like me. When I love a print or painting or picture, I think the bigger the better. So that it's seen and makes a statement.
I decided to put it on a tray.
 Miachaels has these Trays. I wanted this print to pop in a place it would be seen. I decided putting it on a tray would make it something that could be seen in the Kitchen, the dinning room, on a shelf or china cabinet, and wonderful dishes and things could go with it.
 These are the supplies I used. (minus the vintage style lace :)
I love Acrylic paint.
Raw umber and I wanted that wonderful Robbins eggs blue color. This tub of paint did not give me a name but for those that want to know its brand is Grumbacher~ permanent blue light C257 all came from Michaels. I choose card stock to do this project, but one could also use fabric. and then of course the wonderful Mod podge!
 I gave the tray two coats of raw umber. There was no need to do the middle because that is were the print was going to go.

Then I gave the tray two coats of this wonderful blue! The pic was taking with only one coat on it.
I let all this dry over night. then I sanded it...to give the tray that wonderful old look. next I put Mod podge on the tray as well as the back of the fabric. Since I was using card stock I had on hand. I pieced the card stock to frame the print. Like the fabric I put the mod podge on the tray as well as on the back of the card stock. When everything was in place and dry. I added two more coats of Mod podge to the inside of the tray. not just the bottom but the sides as well. This seals the tray and even tho I plan to use this for decorative purposes, the tray then can function as a 'real tray' for serving tea for two...or bringing out cookies etc...any spills will not damage the fabric or paper :)
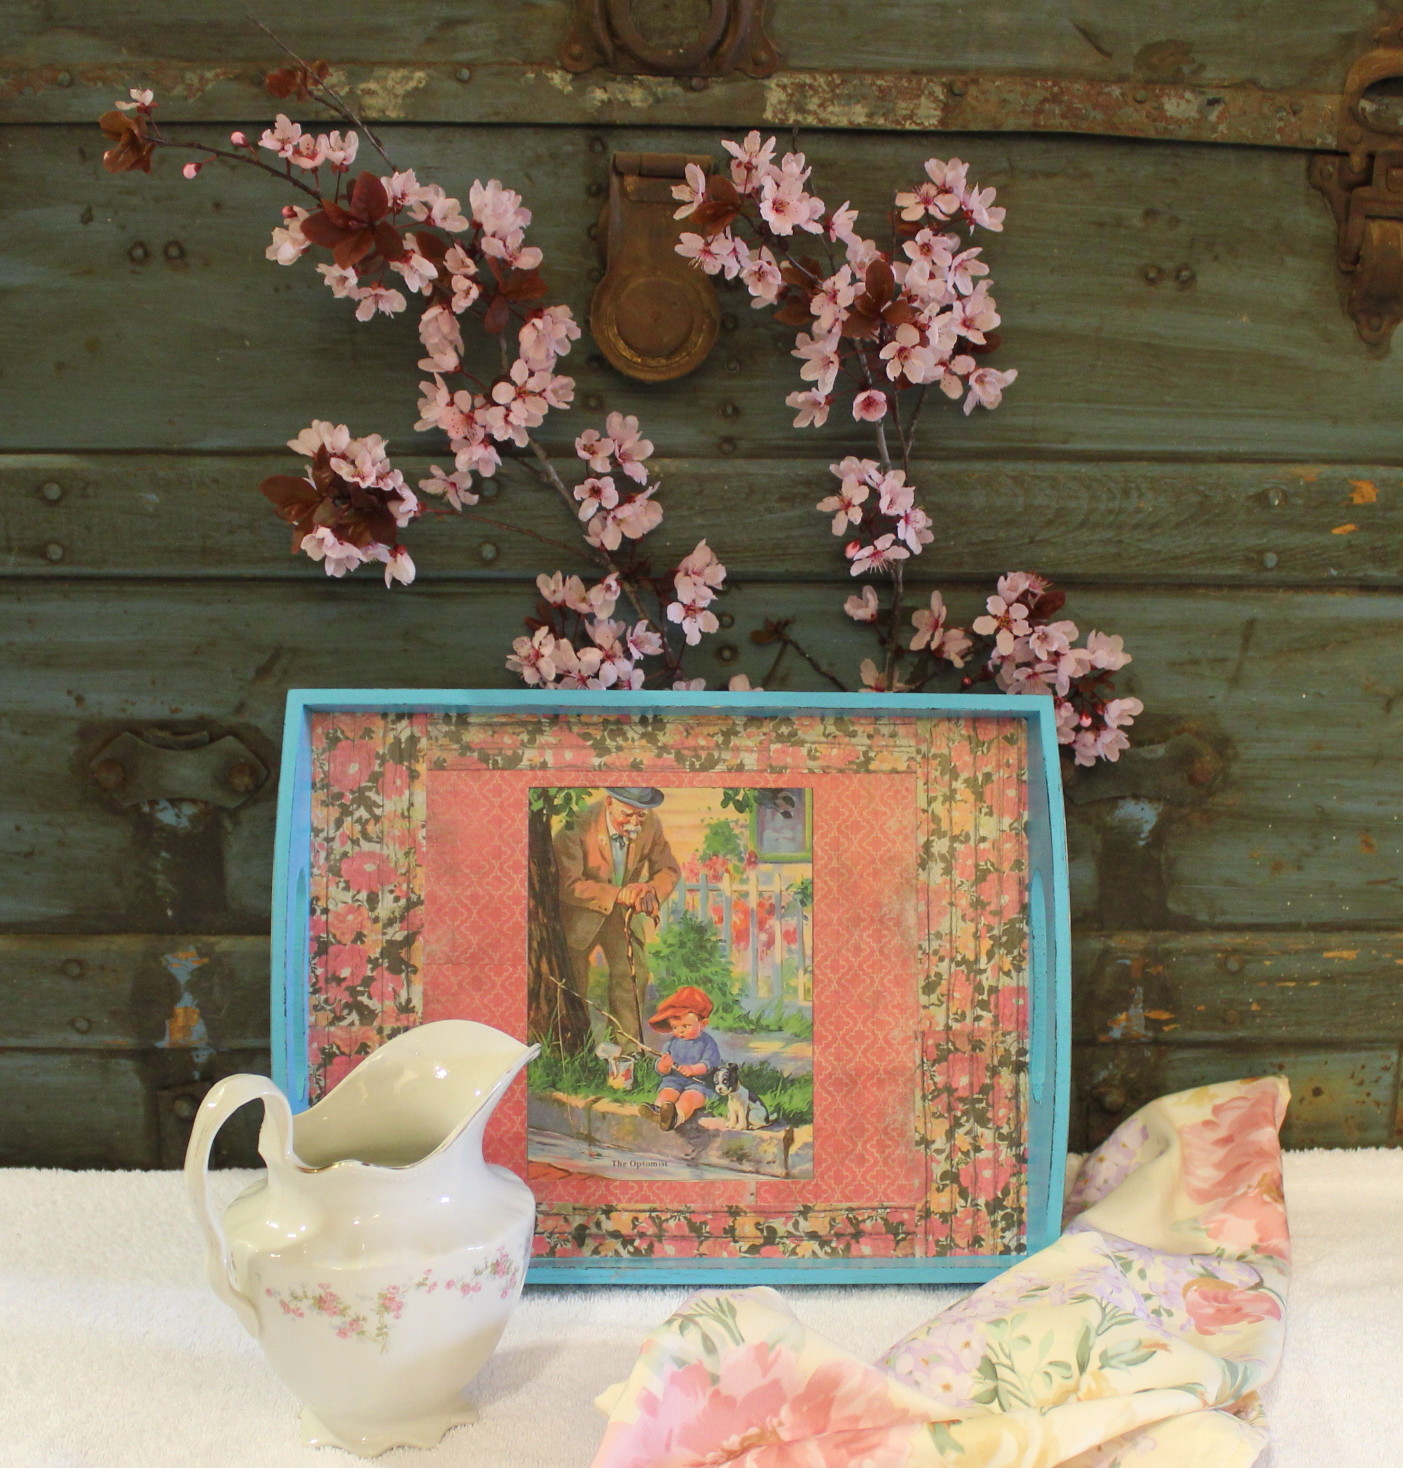
 Ta daa...the finished Tray!
 The card stock I used, had a wonderful aging feel to it, as well as a floral vintage like print. The blue brought out the blue in the print and the floral card stock brought out the floral in the background of the print.
 I love the aged look :)
 I love how it brings out the flaws in the wood.
 And I love how it makes this piece look like it's been around awhile.
 Due to being in a hotel room, I cant show this propped up in my kitchen or on a shelf or china cabinet. But I know...it will pop and be noticed. And anything that will bring someone a smile....shouldn't go unnoticed.......
I found on ebay, a woman who sells wonderful vintage reproduction prints on fabric. And I fell in love with this print.

I wondered how could i make this into a display piece! The print is only a 5x7. If your anything like me. When I love a print or painting or picture, I think the bigger the better. So that it's seen and makes a statement.
I decided to put it on a tray.


I love Acrylic paint.
Raw umber and I wanted that wonderful Robbins eggs blue color. This tub of paint did not give me a name but for those that want to know its brand is Grumbacher~ permanent blue light C257 all came from Michaels. I choose card stock to do this project, but one could also use fabric. and then of course the wonderful Mod podge!


Then I gave the tray two coats of this wonderful blue! The pic was taking with only one coat on it.
I let all this dry over night. then I sanded it...to give the tray that wonderful old look. next I put Mod podge on the tray as well as the back of the fabric. Since I was using card stock I had on hand. I pieced the card stock to frame the print. Like the fabric I put the mod podge on the tray as well as on the back of the card stock. When everything was in place and dry. I added two more coats of Mod podge to the inside of the tray. not just the bottom but the sides as well. This seals the tray and even tho I plan to use this for decorative purposes, the tray then can function as a 'real tray' for serving tea for two...or bringing out cookies etc...any spills will not damage the fabric or paper :)


No comments:
Post a Comment
Thank you for stopping by. Would love to hear from you!